앱의 Lifecycle, 생명주기는 앱의 실행부터 종료까지의 상태 변화라고 볼 수 있다.

앱이 어떤 생명 주기에서 어떤 동작을 해야하는지 잘 정의하면 된다. 즉, Lifecycle event에 잘 respond 하는 것이 개발자가 할 일이다.
iOS 13부터는 scene이라는 개념이 생겼는데, 이는 하나의 앱이 여러 개의 scene 인스턴스를 가질 수 있게 되었음을 뜻한다.
예를 들면, 아이패드에서 하나의 필기 어플을 2개의 화면으로 띄워서 사용하는 경우를 떠올려보면 이해하기 쉽다.
multi scene 환경에서는 서로 다른 scene은 서로 다른 인스턴스로, 각자의 생명주기를 갖게 된다.
그렇기 때문에 iOS 13 이전에 AppDelegate에서 Process Lifecycle과 UI Lifecyle을 둘 다 담당했다면,
iOS 13 이후에는 AppDelegate에서 Process Lifecycle과 Session Lifecycle을, SceneDelegate가 UI Lifecycle을 담당하는 것으로 나누어졌다.
그럼 iOS, UIKit에서는 Lifecycle을 어떻게 정의하고 있을까?
공식 문서에서는 "Scene-based"와 "App-based"로 나누어서 Lifecycle event의 종류를 정의했다.
먼저, iOS 12 이하에서의 app-based life-cycle events는 아래와 같다.

Not Running, Inactive, Active, Background, Suspended 로 나누어져있다.
다음으로, iOS 13 이상에서의 scene-based life-cycle events는 아래와 같다.
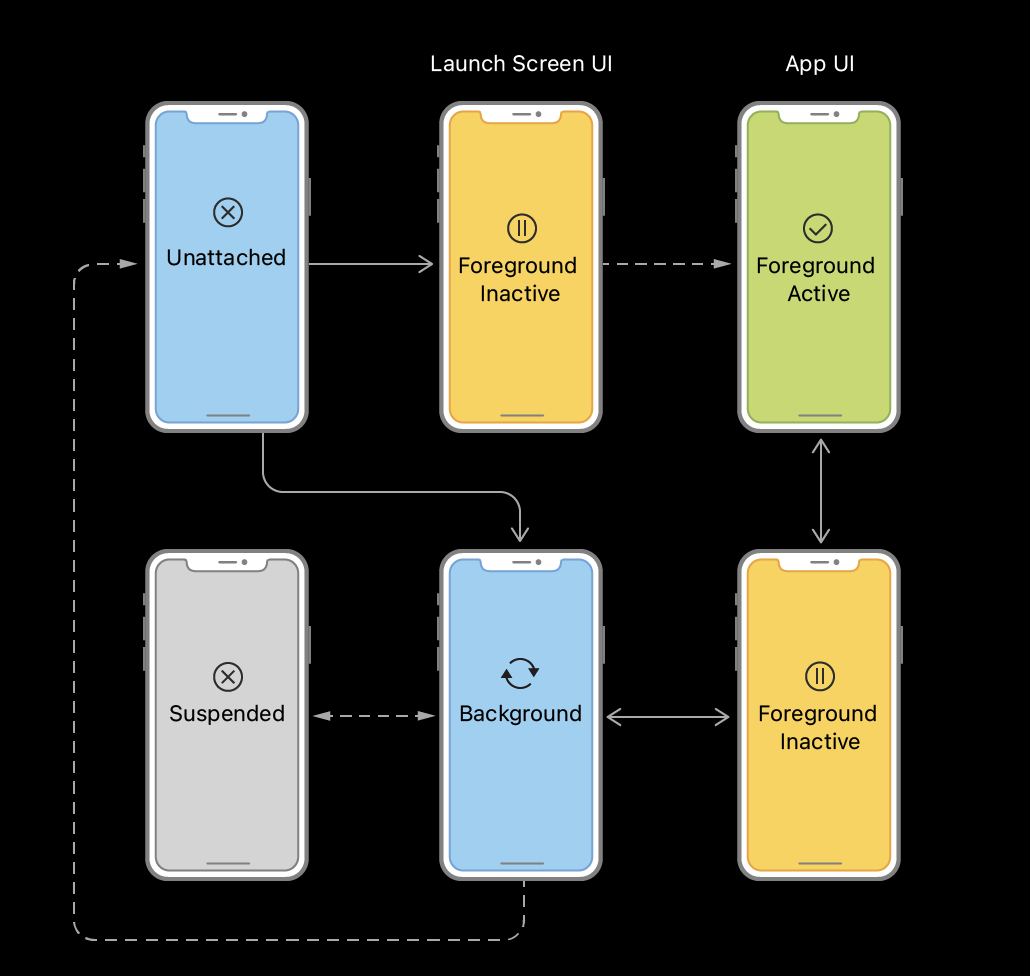
Unattached, Foreground Inactive, Foreground Active, Background, Suspended 로 나누어져있다.
SwiftUI에서도 UIKit처럼 AppDelegate와 SceneDelegate를 사용한다.
SwiftUI에서는 뷰의 life cycle update에 맞춰 어떻게 코드를 쓸 수 있을까?
View 관련
Apple 공식 문서 속 View fundamentals 부분을 보면, view life cycle updates에 반응할 수 있는 방법을 소개한다.
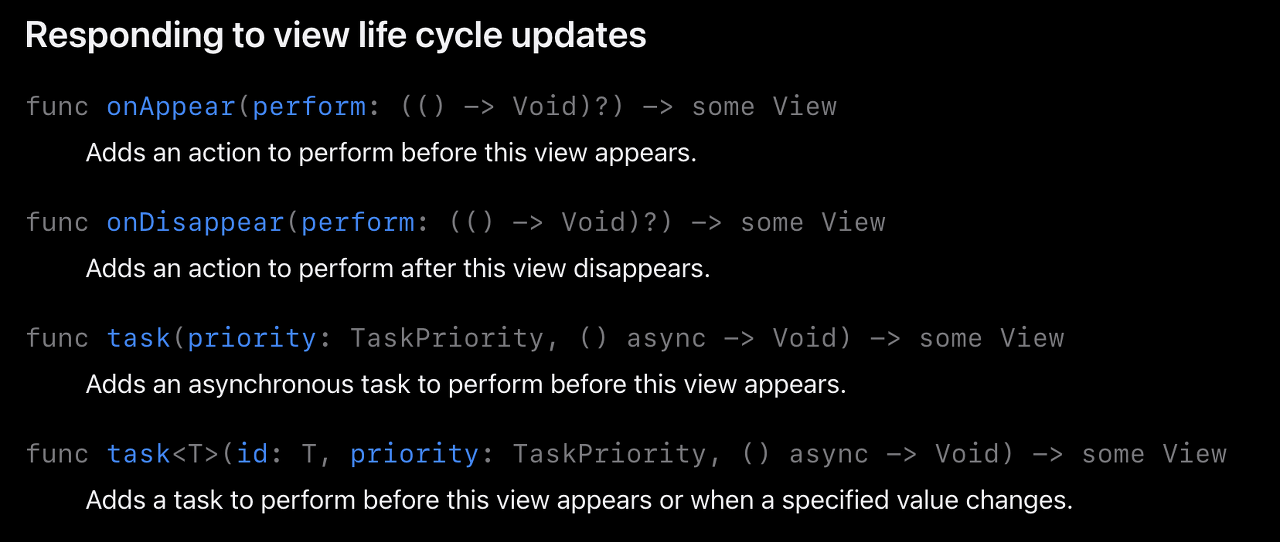
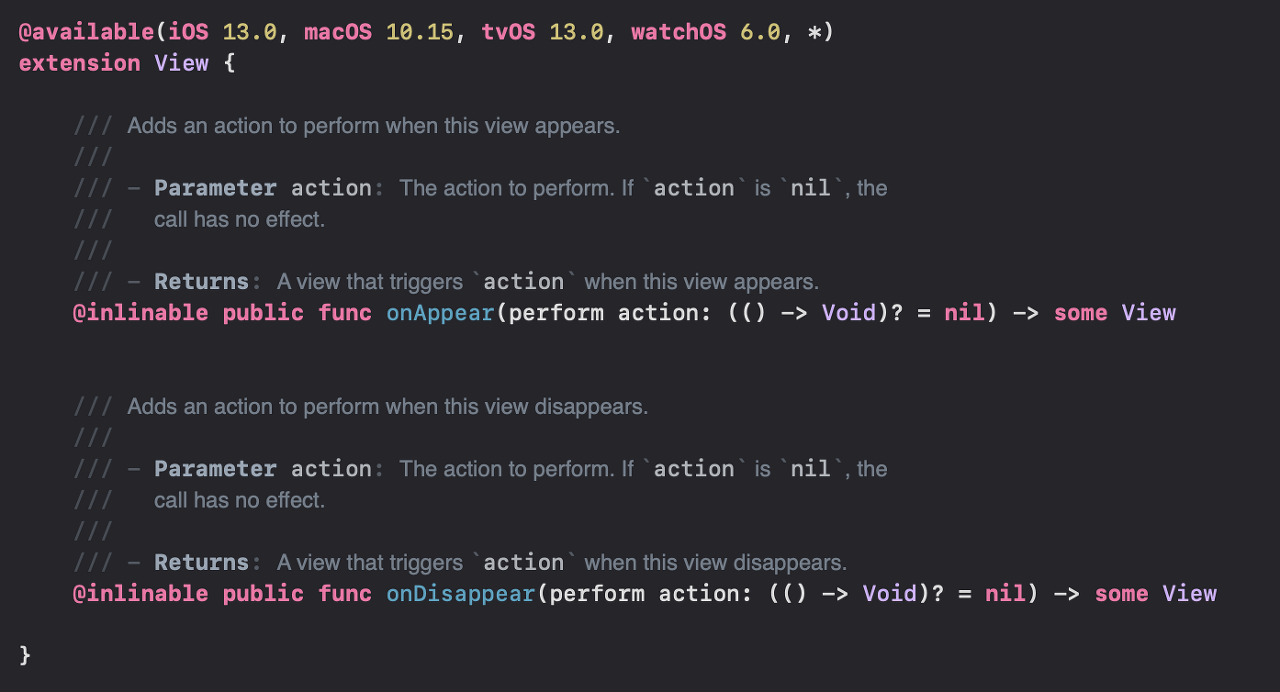
.onAppear()
Adds an action to perform before this view appears.
.onDisappear()
Adds an action to perform after this view disappears.
.task()
Adds an asynchronous task to perform before this view appears.
Or, Adds a task to perform before this view appears or when a specified value changes.
이렇게 3가지 방법이 나와있다.
설명이 되어있는 것처럼,
.onAppear()은 해당 뷰가 사용자의 눈에 보이는 순간에 동작하는 것이 아니다.
뷰가 나타나기 이전이라는 것만 보장한다는 것을 주의해서 사용해야한다.
UIKit에서는 각 뷰에 대한 Lifecycle events에 관련해서는 UIViewController를 사용한다.
UIViewController를 통해 init, loadView, viewDidLoad, viewWillAppear, viewDidAppear, viewWillDisappear, viewDidUnload 등을 사용해서 뷰의 생명주기 업데이트에 맞춰 코드를 쓸 수 있었다.
App, Scene의 시작과 종료 관련
@main
@main으로 앱의 entry point를 지정한다.
AppDelegate와 SceneDelegate
그리고 AppDelegate와 SceneDelegate를 적용하여 사용한다.
UIApplicationDelegate를 채택하여 AppDelegate class를 구현하면, 그 내부에는
func application(_ application: UIApplication, configurationForConnecting connectingSceneSession: UISceneSession, options: UIScene.ConnectionOptions) -> UISceneConfiguration


func application(_ application: UIApplication, didFinishLaunchingWithOptions launchOptions: [UIApplication.LaunchOptionsKey: Any]?) -> Bool


func application(_ application: UIApplication,
                     didReceiveRemoteNotification userInfo: [AnyHashable: Any]) async
    -> UIBackgroundFetchResult


func application(_ application: UIApplication, didRegisterForRemoteNotificationsWithDeviceToken deviceToken: Data)


func application(_ application: UIApplication, open url: URL, sourceApplication: String?, annotation: Any) -> Bool


func application(_ app: UIApplication, open url: URL, options: [UIApplication.OpenURLOptionsKey: Any] = [:]) -> Bool
등의 application이 시작될 때의 동작을 정의할 수 있다.
UIWindowSceneDelegate를 채택하여 SceneDelegate class를 구현하면, 그 내부에는
func scene(_ scene: UIScene, openURLContexts URLContexts: Set<UIOpenURLContext>)등의 scene이 시작될 때의 동작을 정의할 수 있다.
BackgroundTask
iOS 16부터는 BackgroundTask 라는 새로운 기능이 추가되었다.
공식 문서를 참고하면, App의 refresh 등에 유용하게 적용할 수 있을 것 같다.

'1 - iOS' 카테고리의 다른 글
| [iOS/Swift] from SQLite to Realm Local DB migration (0) | 2022.12.22 |
|---|---|
| [iOS/Swift] Local DB 비교(Core data, SQLite, Realm) (2) | 2022.12.07 |
| [iOS/Swift] 'alert' was deprecated in iOS 14.0 (0) | 2022.10.28 |
| [iOS/Swift] Haptic feedback, Haptic effect, 진동 효과 (0) | 2022.10.28 |
| [Xcode] Xcode 웹에서 설치하기, 수동 설치 방법, 업데이트 멈춤 해결 (0) | 2022.09.19 |


